React Native
Learn how to use React Native with deepstream
React Native lets you build mobile apps using only JavaScript. It uses the same design as React, letting you compose a rich mobile UI from declarative components.
Now that deepstream implements websockets, integrating it with your React Native app via the JS connector has become a breeze. The following steps will take you through the process with a hello world-esque example (skip to solution).
1. Start the server
Let’s start by installing the server. Just pick the right version for your operating system and follow its steps. Once the server is installed, you can start it with:
deepstream start2. Set up the HTML side (optional)
To try some quick tests between the React Native Simulator and a browser window, you can set up an HTML side following the quickstart guide.
3. Initialize and run a new React Native application
First initialize the project in your terminal
react-native init DeepstreamReactNativeMove into the project folder
cd DeepstreamReactNativeFetch the deepstream code and the url lib it depends on. For usage in react-native the install must include an environment variable in order to run a postinstall script that facilitates integration with react-native. For further explanation see this issue.
DEEPSTREAM_ENV=react-native npm install @deepstream/client --saveRun the app in the iOS simulator (or check the React Native docs for use with the Android simulator)
react-native run-ios4. React Native Boilerplate
Usually, both the Android and iOS index files are redirected to a central app. To keep things simple for this example, we’ll just alter the index.ios.js file. Note that you should implement this code in index.android.js if you are working with the Android simulator.
Replace the contents of index.ios.js with the following to get a simple text input field in your app:
import React, { Component } from 'react';
import { AppRegistry, TextInput } from 'react-native';

export default class DeepstreamReactNative extends Component {
  constructor(props) {
    super(props);

    const text = '';

    this.state = { text }
  }

  render() {
    const { text } = this.state

    return (
      <TextInput
        style={ {
          height: 40,
          width: 300,
          borderWidth: 2,
          margin: 35,
          padding: 10
        } }
        autoCorrect={false}
        value={text}
        onChangeText={(text) => this.setState({ text })}
      />
    );
  }
}

AppRegistry.registerComponent(
  'DeepstreamReactNative',
  () => DeepstreamReactNative
);
5. Import the deepstream JS component
Since we already installed deepstream in step 3, all we need to do now is import it:
import React, { Component } from 'react';
import { AppRegistry, TextInput } from 'react-native';
import { DeepstreamClient } from '@deepstream/client';

// ...
Then setup the client and record like we saw in the quickstart guide
constructor(props) {
  super(props)

  const client = new DeepstreamClient('localhost:6020')
  client.login()

  const record = client.record.getRecord('some-name')
  // ...
6. Subscribe to changes in our value
Since our text element is already depending on the value of text in our state, we only need to make sure to update that value whenever our record changes:
constructor(props) {
  super(props);

  const client = new DeepstreamClient('localhost:6020')
  client.login()

  const record = client.record.getRecord('some-name')
  const text = ''

  record.subscribe('payload', text => this.setState({ text }));

  // ...

  this.state = { record, text }
7. Push changes from React Native
For the full circle, we will also have to push any change in our text input back to the server. To achieve that, let’s create a method and bind it to the input’s onTextChange:
constructor(props) {

  // ...

  const setRecordFn = (value) => this.state.record.set('payload', value);

this.state = { record, text, setRecordFn }render() {
const { text, setRecordFn } = this.state
return (
<TextInput
// ...
onChangeText={setRecordFn}
/>
);8. Complete!
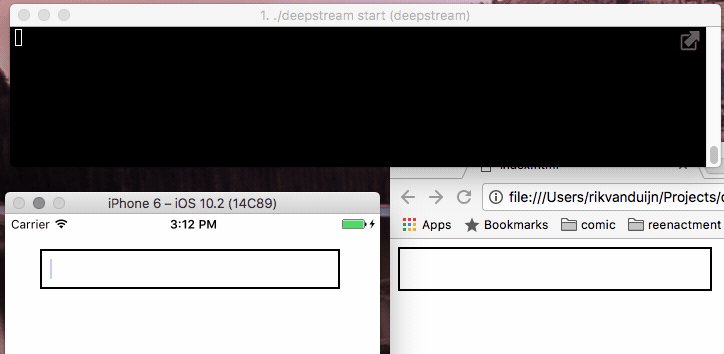
Your index.ios.js should now look as follows, and the app should work as shown in the animation. Happy developing!
import React, { Component } from 'react';
import { AppRegistry, TextInput } from 'react-native';
import { DeepstreamClient } from '@deepstream/client';

export default class DeepstreamReactNative extends Component {
  constructor(props) {
    super(props);

    const client = new DeepstreamClient('localhost:6020')
    client.login();
    const record = client.record.getRecord('some-name');
    const text = '';

    record.subscribe('payload', (value) => this.setState({ text: value }));

    const setRecordFn = (value) => this.state.record.set('payload', value);

    this.state = { record, text, setRecordFn }
  }

  render() {
    const { text, setRecordFn } = this.state

    return (
      <TextInput
        style={ {
          height: 40,
          width: 300,
          borderWidth: 2,
          margin: 35,
          padding: 10
        } }
        autoCorrect={false}
        value={text}
        onChangeText={setRecordFn}
      />
    );
  }
}

AppRegistry.registerComponent(
  'DeepstreamReactNative',
  () => DeepstreamReactNative
);
9. Building for production
If you are using a minifier for your react-native production build (for example when using expo), make sure to include in the project root the metro bundler config file: metro.config.js with the following values:
module.exports = {
  transformer: {
    minifierConfig: {
      keep_classnames: true,
      keep_fnames: true,
      mangle: {
        keep_classnames: true,
        keep_fnames: true
      }
    }
  }
}