IoT Fridge Monitor
deepstream HTTP Internet of Things Fridge Monitor tutorial
Help needed to update and migrate to Guides Section
deepstream’s HTTP API is perfect for low-frequency data updates in low-power environments where the cost of establishing and maintaining a WebSocket connection can be prohibitive.
In this tutorial we’ll use a remote, low-power ESP8266-based system-on-chip and a light sensor to send live light readings to deepstream and display them on a webpage. Additionally, red and green LEDs will show whether the update has been successful.
I’d recommend being familiar with the basics of Records before you start.
Here’s how it looks:
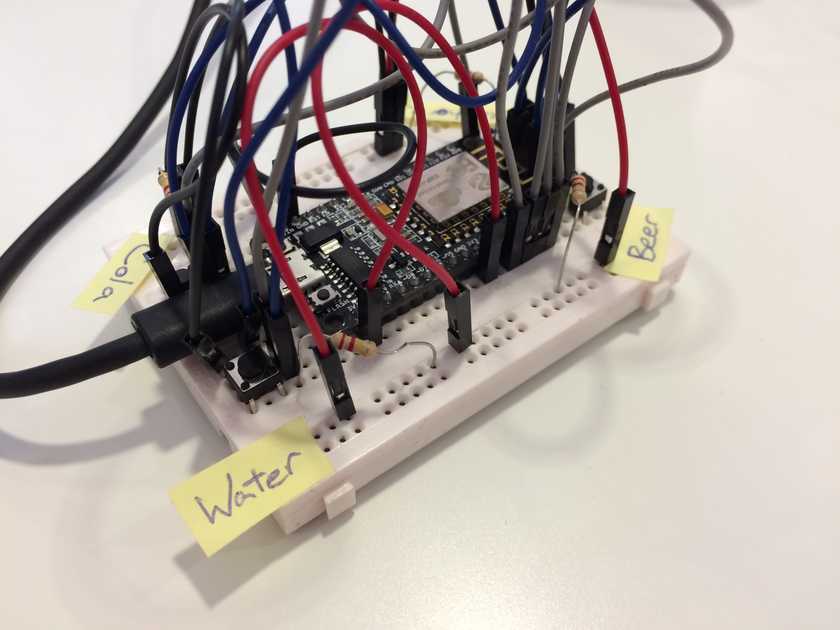
Hardware
- Get hold of a board with an ESP8266 chip. There are many such boards available through merchants and action sites for as little as $5. The one we’re using is listed as an “Elegiant Nodemcu Lua ESP8266 ESP 12E” and cost €10 delivered.
- An electronics breadboard with jumper cables.
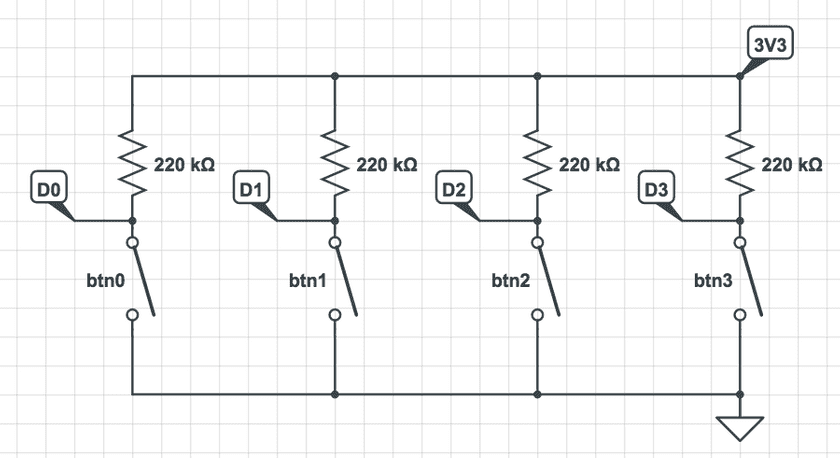
- 4 x momentary switches
- 4 x 220Ω pull-up resistors for the switches.
Setting up
We’ll be using the Arduino IDE to program the device.
- The Arduino IDE is available from here.
- To get your board setup with Arduino IDE I recommend following a guide like this one and try to load up an example sketch like Blink.
- For OSX Yosemite I needed to install the CH340G driver available from here.
- With the board now setup, go to
Sketch > Include Library > Manage Libraries...and search for the ArduinoJson, then click on Install.
Go to File -> New to create a new sketch.
The empty sketch defines two functions:
setup()contains initialization code that is run once when the board is powered on.loop()is run repeatedly until the device is switched off.
To make debugging easier, we can enable debugging over a serial connection.
To do so, simply add the following to the setup() function:
Serial.begin(115200);and open Tools > Serial Monitor to see any output generated.
Reading the button state
To start with, we’ll write some code to read the button inputs, allowing us to respond to button presses when they occur.
First we’ll declare some variables to store state.
// the four digital inputs connected to momentary switches
const int btn0 = D0;
const int btn1 = D1;
const int btn2 = D2;
const int btn3 = D3;

// the last read state of each button where
// true  --> pressed
// false --> not pressed
bool btnState0, btnState1, btnState2, btnState3;
We also need to initialize the pins as inputs before we read:
void setup() {
    // for debug logging
    Serial.begin(115200);

    // initialize buttons
    pinMode(btn0, INPUT);
    pinMode(btn1, INPUT);
    pinMode(btn2, INPUT);
    pinMode(btn3, INPUT);

    // initial button state
    btnState0 = btnState1 = btnState2 = btnState3 = false;
}
Now in loop() we can use the function checkBtn to check the state of each of the buttons.
The variable readDelayMs defines the amount of time between readings in
milliseconds.
const int readDelayMs = 100;

void loop() {
    checkBtn(btn0, btnState0, "inventory/cola");
    checkBtn(btn1, btnState1, "inventory/beer");
    checkBtn(btn2, btnState2, "inventory/water");
    checkBtn(btn3, btnState3, "inventory/apfelschorle");

    delay(readDelayMs);
}

void checkBtn(
    const int btn, // the pin that the button is connected to
    bool &btnState, // the current state of the button
    char *recordName // the name of the record we will update
    ) {
    if (digitalRead(btn) == LOW && !btnState) {
        // button pressed
        Serial.printf("Button pressed: %s\n", recordName);
        btnState = true;
    } else if (digitalRead(btn) == HIGH && btnState) {
        // button released
        Serial.printf("Button released: %s\n", recordName);
        btnState = false;
    }
}
If you build and upload the script now and look in the Serial Monitor window
you should see log lines, with the value changing as the light level changes e.g.
Button pressed: inventory/water
Button released: inventory/water
Button pressed: inventory/beer
Button released: inventory/beer
Connecting to WiFi
To submit this data to deepstream we’ll need an internet connection, so we’ll include the necessary libraries to use the device’s WiFi chip:
#include <ESP8266WiFiMulti.h>
#include <ESP8266HTTPClient.h>
Now we need to initialize the WiFi client, and wait for the connection to be setup:
ESP8266WiFiMulti WiFiMulti;

const char* ssid = "YOUR_NETWORK_SSID";
const char* password = "YOUR_NETWORK_PASSWORD";

void setup() {
    // ...

    // connect to WiFi
    WiFiMulti.addAP(ssid, password);
}

void loop() {
    if (WiFiMulti.run() != WL_CONNECTED) {
      delay(200);
      Serial.print("."); // indicate that device is still connecting
      return;
    }

    // ...
}
Building a request
Each time a button is pressed we would like the corresponding value (stored in a record) to be decremented. That requires a read (to get the current state) followed by a write to set the new value.
You should also select the relevant TLS fingerprint below that relates to the subdomain in your HTTP URL.
const char* deepstreamHttpUrl = "<YOUR HTTP URL>";
/*
 * TLS fingerprints:
 *
 * 013.deepstream.com: "3A:FC:6E:78:94:18:C0:A2:36:F3:C7:DF:86:27:4B:5A:CA:CF:28:3F"
 * 035.deepstream.com: "57:18:5A:22:07:94:03:EF:90:C9:C2:56:58:C9:BB:06:66:A6:EA:76"
 * 154.deepstream.com: "3C:65:CA:7C:3F:43:2D:FF:A1:63:38:F3:23:D5:59:25:E4:85:8C:0F"
 */
const char* deepstreamTlsFingerprint = "<YOUR HTTP DOMAIN FINGERPRINT>";
Using the HTTP API is very similar for record reads and writes, so let’s write
a function that can do both called recordRequest:
#include <ArduinoJson.h> // a library for parsing and serializing JSON objects

// the possible record actions
enum class RecordAction { Read, Write, Head };

// make an HTTP request to read or write a record
JsonVariant recordRequest(RecordAction action, char *recordName, char *path = nullptr, JsonVariant data = {}) {
    HTTPClient http;

    // configure client
    http.begin(deepstreamHttpUrl, deepstreamTlsFingerprint);

    // set content type
    http.addHeader("Content-Type", "application/json");

    // create message body
    jsonBuffer.clear();
    JsonObject& root = jsonBuffer.createObject();
    JsonArray& body = root.createNestedArray("body");
    JsonObject& message = body.createNestedObject();
    message["topic"] = "record";

    switch (action) {
        case RecordAction::Read:
            message["action"] = "read";
            break;
        case RecordAction::Head:
            message["action"] = "head";
            break;
        case RecordAction::Write:
            message["action"] = "write";
            // only writes have a payload
            if (path != nullptr) {
                message["path"] = "amount";
            }
            message["data"] = data;
            break;
        default:
            Serial.printf("Unknown record action %d\n", static_cast<int>(action));
    }

    message["recordName"] = recordName;

    // copy object into array
    size_t requestBodySize = root.measureLength() + 1;
    char requestBody[requestBodySize];
    root.printTo(requestBody, requestBodySize);

    // log request
    Serial.print("request: ");
    root.printTo(Serial);
    Serial.println();

    // make request
    int httpCode = http.POST(requestBody);

    int result = -1;
    if(httpCode == HTTP_CODE_OK) {
        // parse response
        String payload = http.getString();
        jsonBuffer.clear();
        JsonObject& resp = jsonBuffer.parseObject(payload);
        if (!resp.success()) {
            // failed to parse JSON response
            Serial.printf("Failed to parse response: %s\n", payload.c_str());
        } else if (!resp["body"][0]["success"]) {
            // failed to update record
            Serial.printf("Record update error: %s\n", resp["body"][0]["error"]);
        } else {
            // record update success
            Serial.println("Record was updated successfully!");
            result = resp["body"][0]["data"];
        }
    } else if (httpCode < 0) {
        // handle HTTP client error
        Serial.printf("Request failed, error: %s\n", http.errorToString(httpCode).c_str());
    } else {
        // handle HTTP error response
        Serial.printf("Error response %d: %s\n", httpCode, http.getString().c_str());
    }

    http.end();
    return result;
}
Finally we can add a short function decRecord that simply reads the current
state of the record, increments the amount parameter, and writes it back:
void checkBtn(const int btn, bool &btnState, char *recordName) {
    // ...
    } else if (digitalRead(btn) == HIGH && btnState) {
        // button released
        btnState = false;
        decRecord(recordName);
    }
}

void decRecord(char *recordName) {
    JsonVariant recordData = recordRequest(RecordAction::Read, recordName);
    if (!recordData.is<JsonObject>()) {
        Serial.println("Decrement aborted");
        return;
    }
    int amount = recordData["amount"];
    Serial.printf("Record read: %d\n", amount);
    amount--;
    recordRequest(RecordAction::Write, recordName, "amount", amount);
}
We have to create a new HTTPClient for each message, so we’ll create that in
updateRecord() and make sure it’s closed after.
HTTPClient http;

// configure client
http.begin(deepstreamHttpUrl, deepstreamTlsFingerprint);

// ...

http.end();
The deepstream HTTP API uses a JSON payload, so to help us build that we’ll
include the ArduinoJSON library we installed earlier.
The body we’re creating needs to look like this:
{
  "topic": "record",
  "action": "read",
  "recordName": "inventory/beer"
}
{
"topic": "record",
"action": "write",
"recordName": "inventory/beer",
"path": "amount",
"data": 25
}Here’s the code to do that:
#include <ArduinoJson.h>

void updateRecord(int level) {
    // ...

    // create message body
    StaticJsonBuffer<200> bodyBuff;
    JsonObject& root = bodyBuff.createObject();
    JsonArray& body = root.createNestedArray("body");
    JsonObject& message = body.createNestedObject();
    message["topic"] = "record";
    message["action"] = "write";
    message["recordName"] = "readings/light-level";
    message["path"] = "value";
    message["data"] = level;

    // copy object into array
    size_t bodySize = bodyBuff.size();
    char requestBody[bodySize];
    root.printTo(requestBody, bodySize);
}
Now let’s put this in a POST request:
void updateRecord(int level) {
    // ...

    // set content type
    http.addHeader("Content-Type", "application/json");

    // make request
    int httpCode = http.POST(requestBody);
}
Handling failure
There are three main ways the record update could fail:
- The request could fail e.g. a connection error
In this case
httpCodewill be negative. - The request could fail to parse or authenticate on the server.
In this case
httpCodewill be a 4xx response. - The record update could fail e.g. the Valve permissions to not allow writes
In this case
httpCodewill be 200, but the JSON response will indicate a failure.
Let’s handle those and log the outcome:
void updateRecord(int level) {
    // ...

    if(httpCode == HTTP_CODE_OK) {
        // parse response
        String payload = http.getString();
        StaticJsonBuffer<200> respBuff;
        JsonObject& resp = respBuff.parseObject(payload);
        if (!resp["body"][0]["success"]) {
            // failed to update record
            Serial.printf("Record update error: %s\n", resp["body"][0]["error"]);
            return;
        }
        // record update success
        Serial.println("Record was updated successfully!");
    } else if (httpCode < 0) {
        Serial.printf("Request failed, error: %s\n", http.errorToString(httpCode).c_str());
    } else {
        Serial.printf("Error response %d: %s\n", httpCode, http.getString().c_str());
    }
}
Now let’s set up the green LED to flash if the update is successful, the red LED otherwise:
const int greenLed = D1;
const int redLed = D2;

void setup() {
    // ...

    // initialize LEDs
    pinMode(redLed, OUTPUT);
    pinMode(greenLed, OUTPUT);
    digitalWrite(redLed, LOW);
    digitalWrite(greenLed, LOW);
}

void flashLed(int led) {
    digitalWrite(led, HIGH);
    delay(500);
    digitalWrite(led, LOW);
}

void updateRecord(int level) {
    // httpCode will be negative on error
    if(httpCode == HTTP_CODE_OK) {
        // parse payload
        // ...
        if (!resp["body"][0]["success"]) {
            // failed to update record
            Serial.printf("Record update error: %s\n", resp["body"][0]["error"]);
            flashLed(redLed);
            return;
        }
        // record update success
        Serial.println("Record was updated successfully!");
        flashLed(greenLed);
    } else if (httpCode < 0) {
        Serial.printf("Request failed, error: %s\n", http.errorToString(httpCode).c_str());
        flashLed(redLed);
    } else {
        Serial.printf("Error response %d: %s\n", httpCode, http.getString().c_str());
        flashLed(redLed);
    }
}