User-Specific Data
How to send different data for each user
A frequent requirement for any app is the need to send different data to different users. Whether it’s updates to a social feed, discounts for frequent buyers, a list of matches on a dating platform, or any other kind of private or at least user-specific information.
Fortunately, all three of deepstream’s core concepts - data-sync, publish-subscribe, and request-response - provide various means to achieve this. The trick? Combine user-specific record or event names with deepstream’s permissioning language Valve.
User-Specific Records
Providing private or user-specific records is as simple as including the username in the record name. If your social network has a profile for Lisa Miller, simply store the profile in a record called profile/lisa-miller:
const profile = ds.record.getRecord('profile/lisa-miller')Now we need to make sure that everyone can read that profile but only Lisa can
edit her information and we can enforce this using Valve. In the record section in permissions.yml let us create the following rule:
  "profile/$username":
    read: true
    write: "user.id === $username"
How does this rule work? First we specify profile/$username as a pattern. Whenever a record with a name matching this pattern is accessed, the rule will be applied.
read: true makes sure that everyone can read the record’s data. user.id === $username ensures that the $username part of the record name needs to match the username the user is currently logged in with if they wish to write.
User-Specific RPCs
Ok, so far, so simple. Let’s look at a more advanced example including an HTTP authentication endpoint and a backend process that provides user-specific data as a response to remote procedure calls (RPCs). Say we’re running an online pet-food shop and the more frequently a user orders, the higher a discount she gets. This means we need three things in our e-marketplace setup:
- an authentication server that checks the credentials of the user trying to log in,
- a backend process that has access to prices as well as user discounts and can provide a RPC to retrieve a price,
- a way to make sure that the username the client provides when asking for the price is in fact their own.
To summarize, our setup will look as follows:
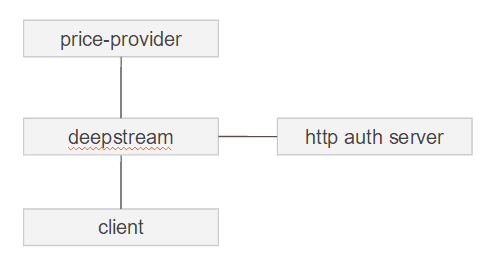
Let’s go through the various components step by step, shall we? First off, the client needs to log in. We’ll use a very basic login form: username, password, and an button labeled “login” is all we need.

You can find this and all other files for this guide in the accompanying Github repo.
Once the user hits “login”, the client executes deepstream’s login method, providing the username and password as data.
login() {
    this.ds = deepstream( 'localhost:6020' )
    this.ds.login({
        username: this.username(),
        password: this.password()
    }, this._onLogin.bind( this ))
}The username and password now need to be validated. We’ll do this by telling deepstream to make an HTTP POST request to a given URL. This can be configured in the auth section of config.yml:
auth:
  type: http
  options:
    endpointUrl: http://localhost:3000/authenticate-user
    permittedStatusCodes: [ 200 ]
    requestTimeout: 2000
This request will be processed by a simple HTTP server written in Express that checks the credentials and returns the HTTP status code 200 for successful and 403 for failed login attempts.
For simplicity’s sake we’ll use a hardcoded map of cleartext passwords here. In the real world this information would ideally be hashed and stored in a database or provided by an open authentication API.
const express = require('express');
const bodyParser = require('body-parser');
const app = express();
const port = 3000;
const users = {
  'user-a': { password: 'user-a-pass', serverData: { role: 'user' } },
  'user-b': { password: 'user-b-pass', serverData: { role: 'user' } },
  'data-provider': {
    password: 'provider-pass', serverData: { role: 'provider'}
  }
}

app.use(bodyParser.json());

app.post('/authenticate-user', function (req, res) {
    console.log( 'received auth request for ' + req.body.authData.username );
    const user = users[ req.body.authData.username ];
    if( user && user.password === req.body.authData.password ) {
        res.status( 200 ).json({
            username: req.body.authData.username,
            serverData: user.serverData
        });
    } else {
        res.sendStatus( 403 );
    }
});

app.listen( port, function () {
    console.log( `listening on port ${port}` );
});
Did you notice the extra “user” called data-provider above? We’ll use it to authenticate connections from backend processes that can provide data to the user. Such a “provider” would first need to connect and log into deepstream:
const deepstream = require( '@deepstream/client' );
const deepstreamUrl = 'localhost:6020';
const credentials = { username: 'data-provider', password: 'provider-pass' };
const ds = deepstream( deepstreamUrl );

ds.login( credentials, ( success, error, errorMsg ) => {
    if( success ) {
        console.log( 'connected to ' + deepstreamUrl );
    } else {
        console.log( `failed to connect to ${deepstreamUrl} with ${errorMsg}` );
    }
});
Next up, we’ll want to provide an RPC called get-price. This means we tell deepstream that whenever a client asks for get-price, this provider will be able to answer that question.
const itemPrice = 100;
const userdata = {
    'user-a': { discount: 0.1 },
    'user-b': { discount: 0.3 }
}

ds.rpc.provide( 'get-price', ( data, response ) => {
    const discount = userdata[ data.username ].discount;
    const finalPrice = itemPrice - ( discount * itemPrice );
    response.send( finalPrice );
});
Let’s look through the snippet above. For simplicity, we specify our price and our various discounts as static data. Now when a user makes a request, they send their username as part of the RPC data:
this.ds.rpc.make( 'get-price', { username: this.username() },
this._onRpcResponse.bind( this ) );
To ensure that the provided username is in fact the one the user is logged in with, we’ll use deepstream’s permissioning language Valve again:
request: "data.username === user.id"The rule above means that the provider can be sure to get a valid, authenticated username and can return a price with the correct discount applied.
User-Specific Events and Listening
Ok, so what about user-specific “events”, deepstream’s publish-subscribe mechanism. Fundamentally, they work the same way as records: Make the username a part of the event name and use Valve to ensure that only the right user can subscribe to the right event.
But does that mean that you have to constantly send out events for all users, whether they might be online or not? Fortunately not! Deepstream provides a concept called listening that let’s you spy on your clients record or event subscriptions and only provide data when it’s actually needed.
Let’s look at a (somewhat nonsensical) example: For our guide we want users to be created with a series of event messages, e.g., ‘Hey Lisa!’, ‘Ho Lisa!’, ‘Hey Lisa!’, and so on.
this.ds.event.subscribe( 'user-updates/lisa-miller', ( msg ) => {
    // display the message
});
Within our backend provider we now register as a “listener”:
ds.event.listen( 'user-updates/*', ( match, response ) => {
    const username = match.replace( 'user-updates/', '' );
    startUserGreeting( username )
    response.accept()

    response.onStop(() => {
        endUserGreeting( username )
    })
})
Once a client subscribes to user-updates/lisa-miller we now start sending specific messages for lisa-miller - once Lisa unsubscribes we stop. And just to make sure, the same works for records as well.